Trick items are powerful artefacts you will come across during your runs. They’re called ‘tricks’ because they are quite literally capable of ‘tricking’ the flow of cause and effect of the universe. They’re cognate with relics in Slay the Spire and items in The Binding of Isaac.
There are about 300 tricks in the alpha (we say ‘about’, because we’re not even sure at this point). This list is only going to expand in the future. They will prove a pivotal role in all of your runs, and mastering them is absolutely essential.
When it comes to tricks, there’s far too many to go over individually, but you’ll be able to browse ones you’ve seen or unlocked in the in-game encyclopedia. Additionally, you can view details on characters’ starting tricks via their wiki articles.
Acquisition #
Every character will start with at least two tricks, and for the most part, these will be unique to the character and can’t be found elsewhere in the game. As a result, you’ll be steered towards playing each character a little differently from one another.
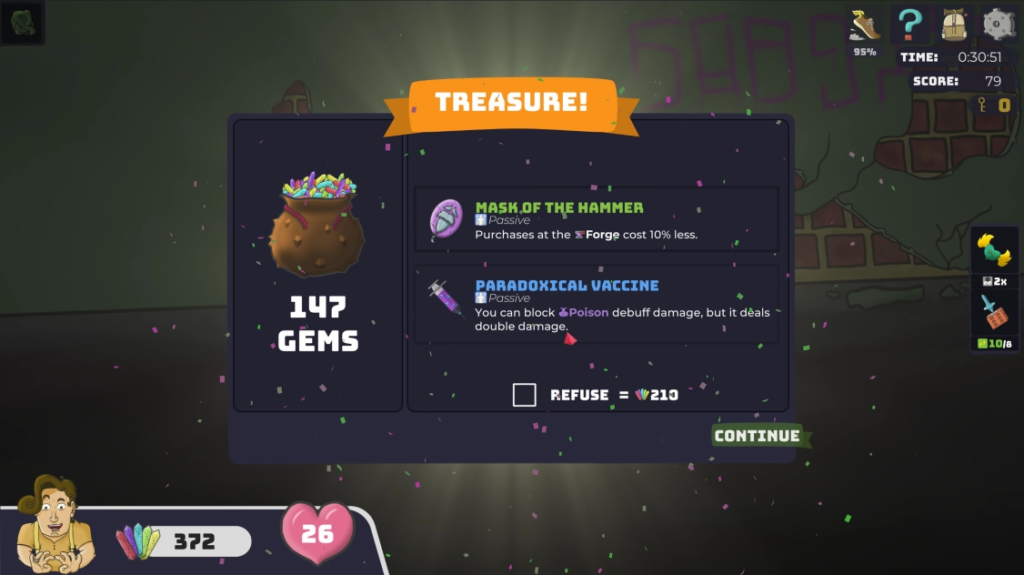
Aside from starting tricks, there are additional ways of acquiring tricks during your runs: battles, treasure rooms, and shops. For the first two, you will be offered a choice of two tricks: you can take only one of them, or refuse both in exchange for more gems. Shops will offer you a selection of tricks in exchange for gems. Any trick you don’t take will be removed from the spawn pool and will never show up again during that run, so choose wisely.

You will be guaranteed a trick offer every 4 battles, but if you’re lucky, there’s a chance to be offered one before this point. Additionally, if you manage to defeat every single regular enemy encounter on a level, the last battle will also guarantee you a trick – though doing so might be a real challenge.
There are 2 treasure rooms in each level, each offering a choice of two tricks. These will generally be rarer than tricks you get in battles. As a result, finding these chests as soon as possible is vital to any run, and your first objective in a level should be to find at least one of them.
You’ll also run into locked chests, which contain a much rarer selection of tricks. To unlock them, you’ll need to find a key, which are guarded by tough enemies somewhere in the level.
For more details, see the advanced notes on trick rewards.
Rarity #
There are six rarities of tricks, from lowest to highest: common, uncommon, rare, epic, legendary, and curio. The colour of the trick’s name denotes its rarity tier. As you’d expect, the rarer the trick, the less likely you are to come across it. Curio tricks are unique in that they can’t be acquired through conventional means; they either come with a character, are awarded by bosses, or through more secretive means. Treasure chests will always contain uncommon or rarer tricks, but battles can offer any rarity. Boss fights will offer a curio, as well as a rare, epic, or legendary trick.
An important thing to note is that rarity does not necessarily reflect a trick’s usefulness; that’s really up to you to decide given your current build. A common trick may end up having a greater impact for you than a legendary one under the right circumstances.
Certain powerful curios are rumoured to be hidden somewhere in the multiverse, which can be acquired by unlocking the hidden potential in specific tricks, or by gathering a particular collection of others. You’ll find clues for these in a trick’s flavour text, which you can read in the encyclopedia or the tricks tab of your inventory.
For more details, see the advanced notes on trick rarity.
Pools #
There are several trick pools: enemy, blood enemy, elite, treasure, boss, and shop. Certain tricks can appear in only one, but many can appear in multiple. If you refuse a trick that appears in several pools, you won’t be able to get it from another later down the line. Learning what tricks you can get from any given pool will go a long way to mastering the game.
Prerequisites #
Many tricks have specific prereqs, or conditions that need to be fulfilled before they can be offered to you. For the most part, these will involve either being on a certain level or having dice of a particular quality, element, or quantity in your inventory. These same factors can also exclude a trick from being offered to you; True Nature, for instance, requires you to have strong nature dice and no fire dice.
Some tricks require you to have other tricks as a prereq, and for the most part, they will interact with that trick in a specific way. The most common examples of this are the parry tricks Auto-Parry and Deadly Riposte. Having one or both of these will open up several tricks to be offered in the future, namely Faultless Defence and Elemental Retaliation – and, for Deadly Riposte only, the legendary Technique #37.
Picking up certain tricks will exclude others from appearing – you can only have one of the four Amulets, for instance. Certain tricks may also alter the chance others appearing, either positively or negatively. For example, picking up any form of Dicewarp will make all other kinds much rarer, though never exclude them, whereas picking up both Randinium Contamination and Randinium Corruption will increase the likelihood of Randinium Coalescence being offered.
We’ll be documenting trick prereqs in the encyclopedia in patch 1.1, so you’ll be able to plan your builds much more carefully.
Usage types #
There are seven main usage types, and each trick falls under one of these categories. A trick’s usage is denoted under its name, with an associated icon as well as its name in italics.
Passive #

Passive tricks are by far the most common type. They’re very simple to use: one you acquire them, their effect will persist throughout the rest of your run, and activate automatically. You’ll see a list of all passive tricks relevant to your current situation in the passive bar at the top left of the screen. Hovering over them will display additional information.
A few tricks have the passive type as well as one of the following; this is to help distinguish them from those that require manual activation.
Instant effect #

Instant effect tricks are somewhat similar to passive tricks, except they have a one-time effect that activates as soon as you pick them up. The best example of these are the health-upgrading tricks: immediately after acquiring them, your maximum health will be permanently raised.
Charge #

Charge tricks are oftentimes very powerful, and consequently require energy to be used. You can view your charge tricks in battle by clicking on the tricks case in the bottom left of the screen.
Charge tricks have two numbers, separated by a forward slash: the first number is its current charge, or the number of ‘pips‘ it has. The second number is the required charge, or one stock of charge. You gain charge by defeating enemies: 1 pip for each. Suddenly, that quadruple fly battle doesn’t seem quite so annoying, does it? It’s also worth noting that bosses will contain charge points at specific points in the battle, so finding out where those occurs and using them your advantage can help shape your strategy against them.
The charge level can be easily determined at a glance by the colour of the current charge: red means zero charge; yellow means it has charge, but not enough to be used; green means it’s fully charged; blue means it’s overcharged.
Overcharge #
Most charge tricks have an overcharge effect. This means it can be charged above what is necessary for just one usage: for example, if I have an overchargable trick that has 3 pips per charge, it is considered overcharged once it has 6 pips.
Overcharged tricks will either have a greatly strengthened effect, or simply store another regular usage. Additionally, if you use an overcharged trick but you don’t gain any benefit from it being overcharged, many tricks will only use one stock instead of wasting all the precious charge you’ve accrued.
Limited #

Limited tricks are exactly what they sound like: they have limited uses, and once they’re all used up, they break. Some will be activated automatically, but others you’ll have to activate yourself. Make sure you use them only when necessary!
Unlimited #
Somewhat similar to charge tricks, unlimited tricks can be used as many times as you want, though there are restrictions on how many times they can be repeatedly used. They are divided into two categories:

Once-per-round

Once-per-battle
These do exactly what they say on the tin: you can use them once every round, or once every battle.

There’s also a very small category of tricks out there that have no turn, battle, or charge restrictions on use, and are thus truly unlimited – but they’ll probably take something else from you in return…
