Diceheart is a roguelite dungeon crawler with turn-based tactical battles, centred around rolling dice and using them to attack and defend.
In roguelikes and roguelites, gameplay generally consists of runs; that is, a single playthrough of the game is referred to as a run of the game. What sets them apart from other genres is that each run is heavily randomised. This includes level layouts, the enemies you face, and the items you find. Additionally, failure means game over, so you lose all your progress in that run and will have to start all over again. As a result, there’s always a strong element of luck, and it can feel quite punishing at first. The key to mastery is to understand what can be thrown at you, and how you can manipulate it. It’s all about conquering luck.
What makes Diceheart a roguelite instead of a roguelike is that you’ll be able to acquire permanent upgrades to your characters the more you play. Each character has a collection of specific goals that you can achieve in your runs that improve their starting stats and items. Win or lose, you’ll also gain XP and level up, which will unlock new items for you to discover with all characters. You’ll also unlock additional characters by beating tough bounty battles you come across in your runs.
The other main aspect of the gameplay is the turn-based battles. Each level contains a number of enemy encounters that you’ll need to fight through to proceed. Battles consist of taking turns to attack and defend against one another with your dice. You’ll get rewards from battles (and elsewhere), which will help strengthen your character in preparation for the boss and for future levels.
Starting a run #
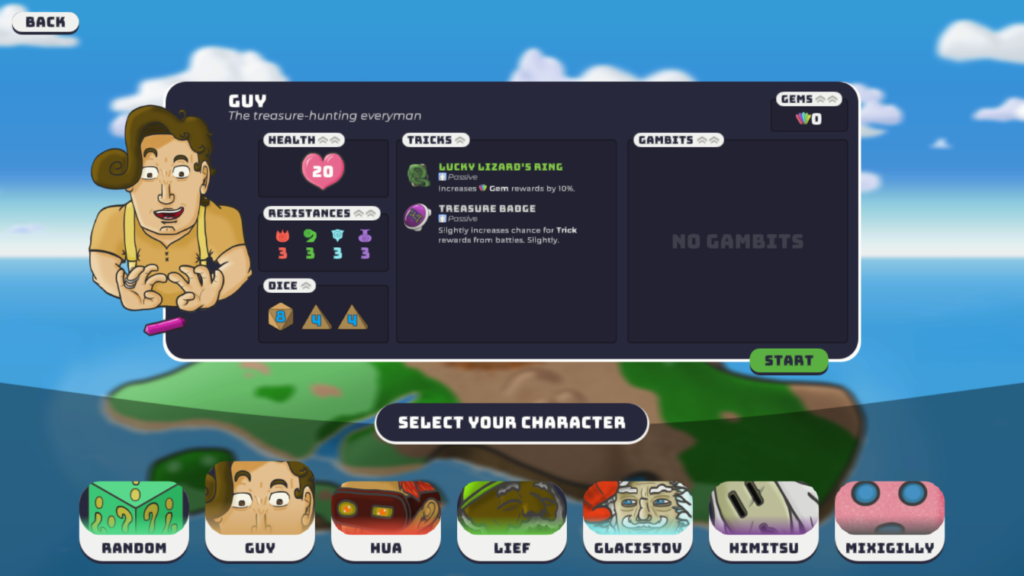
To start a run, you’ll first need to select an available character, each of whom start with different dice, tricks, and stats. For first-time players, this means Guy is your guy – he has high starting health and doesn’t have to worry too much about elemental attacks or tricks, making him a strong choice for beginners just starting out, while also remaining an extremely versatile choice for more advanced players.
So, you’ve started a run, and have been dropped into a spooky cavern. This is the first level of the game, and your main objective is to make your way to the boss and defeat them in order to progress deeper into the Quantum Realm. Sounds simple enough, but the boss is rather tough, and you’ll need to prepare yourself for the fight that awaits you.
When you start, you’ll initially be shown the location of the boss, before the camera pans over to you. Here, you can see rooms adjacent to you, and can move and zoom the camera to get a general lay of the land. You can move to any visible and accessible room by clicking on it. Many enemies will block your path, but you’ll also encounter beneficial rooms such as healing fountains, treasure chests, and dice-upgrading forges, shops, and more.
First, let’s go over the meat of the gameplay in Diceheart: the battles.
Battles #
When you step foot in an enemy room, you’ll immediately enter a battle with a random enemy group. Battles are turn-based, and follow this structure:
- You and the enemies roll your dice.
- The enemies will allocate their dice to either attack you or defend themselves. Their block applies instantly, but they won’t attack you just yet.
- You’ll notice one or two bubbles above each enemy’s healthbar. The red one on the left contains dice they will attack with, and the blue one on the right contains the dice they have blocked with. We call this the enemy’s intent.
- Now it’s your turn. You can now use your dice to attack enemies or block incoming damage. Unlike enemies, your attacks come out instantly.
- Once you’ve ended your turn, any surviving enemies will take turns to attack with their dice from left to right.
- The left to right rule applies to both the enemies themselves and each enemy’s dice. It’s very important to factor this into your calculations, because the order of attacks can drastically change the damage that gets dealt.
- If you survive the onslaught, a new round will begin. The battle continues until all enemies are defeated, you’re defeated (RIP), or you flee.
These are the absolute basics of battles in Diceheart. Things get a little more complicated once you throw elements, items, and abilities into the mix, but if you’re playing as Guy, you don’t have to worry about these too much – just do the maths and try to make the most efficient decisions you can. Remember: there’s no time limit, so you can take as long on each turn as you wish, and take as many turns as you feel is necessary.
Attacking and blocking #
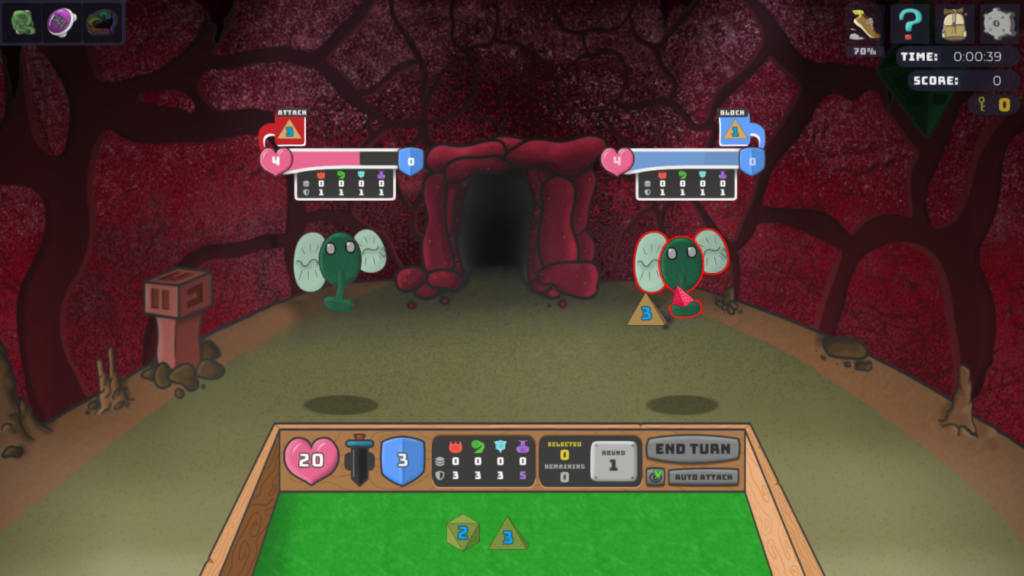
So, how exactly do you attack and block? It’s very simple: drag a die onto an enemy to attack them, or onto the shield on your tray to block. The amount of damage you’ll deal or the block you’ll receive is represented by the number stated on the die (its value).
Doing either of these actions will allocate the die, and it can’t be used again until the next round. Furthermore, all your dice have to be used each round, so ending your turn with any unallocated dice will automatically put them into block. To make things efficient, you can also click multiple dice or drag a box around them to queue them, which allows you allocate several at once. To unselect your dice, right click instead of left click.
When you or an enemy is attacked, the damage will first be dealt to block (the number in the shield), and once that runs out, damage will be dealt directly to their health (the number in the heart). Any leftover block is reset to 0 at the end of each round. If an enemy hits 0 health, it’s defeated; if you hit 0 health, it’s game over. Once you win a battle, you’ll be awarded some gems, and if you’re lucky, you’ll also be offered a trick.
An extremely important thing to bear in mind is that blocking is just as important as attacking. Sources of healing are sparse, so your overall goal in each battle should be to take as little damage as possible, even if it means prolonging the fight. Remember: if you die, you’ll have to start all over again.
The sword icon between your health and block values is the amount of incoming damage you’re going to take to your health with your current amount of block. Always try to reduce this to 0 before you end your turn.
Fleeing #
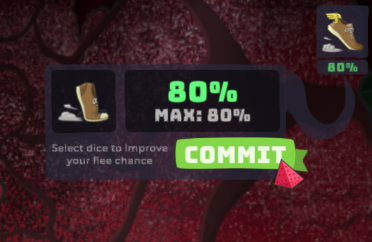
If you’re overwhelmed in a battle, you can attempt to flee. You’ll be able to re-enter and try again later if you wish, perhaps after getting some upgrades or healing. Any enemies you defeated when you fled will stay defeated, but surviving ones will be back at full health.
Fleeing is not a sure thing, however, and your success chance can vary based on a number of factors. In general, the more often you flee, the less likely you are to pull it off, and vice versa. You can also increase your chance to flee by selecting one or more of your dice before committing the attempt, but be careful: if you fail, any dice you selected will be unusable, and you’ll be stuck in a much more dire position!
Tricks #
During your runs, you’ll regularly come across trick items. These are powerful trinkets that will enhance your abilities in future battles and elsewhere. There’s hundreds of tricks in the game, so we can’t go into specifics here; just pick ones you think sound useful to your current situation. You’ll often find that tricks prove more vital in your runs than your dice!
In battle, there’s 2 places you’ll see tricks. Passive tricks are in the top left of the screen. These will activate on their own under certain conditions. Your collection of manual tricks can be seen by clicking the tricks case in the bottom left. In the case of manual tricks, ones that are currently unusable will be greyed out. Hovering over a trick will display its effect, and any valid targets will be highlighted.
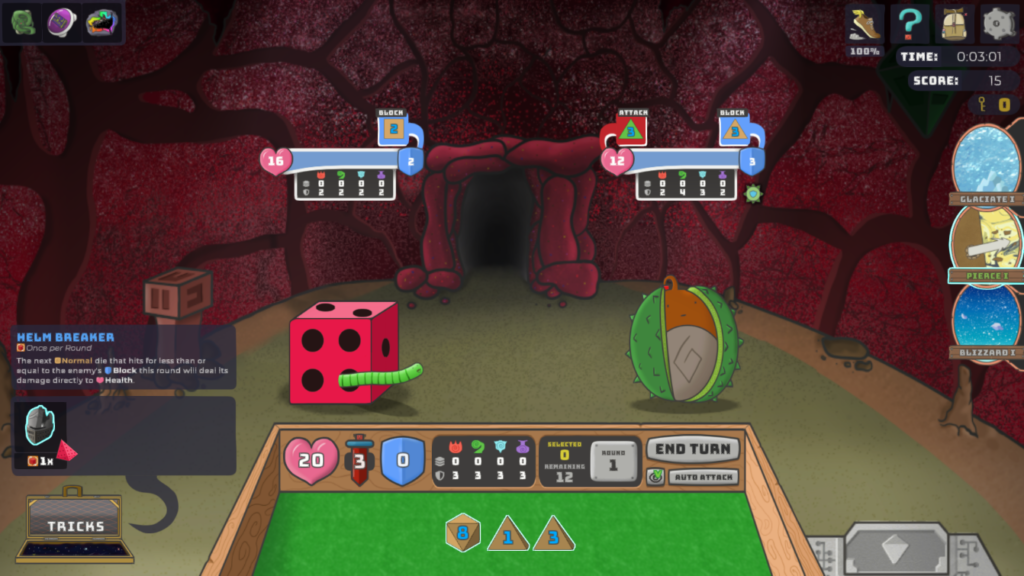
Tricks aren’t limited to just battles, though. You’ll come across plenty of tricks that can be used elsewhere in the Quantum Realm. To access these (as well as view all tricks in your possession), click the inventory icon in the top right of the screen, or press I. Passive tricks will also be shown in the passives bar in locations where they can take effect.
To find out more about tricks, check out the tricks article.
Gambits #
Gambits allow you to channel the power of your dice to produce a variety of effects besides simply attacking and blocking. You’ll find them in chests, enemy encounters, and the shop, and they can potentially help you turn less-than-ideal rolls into powerful utility.
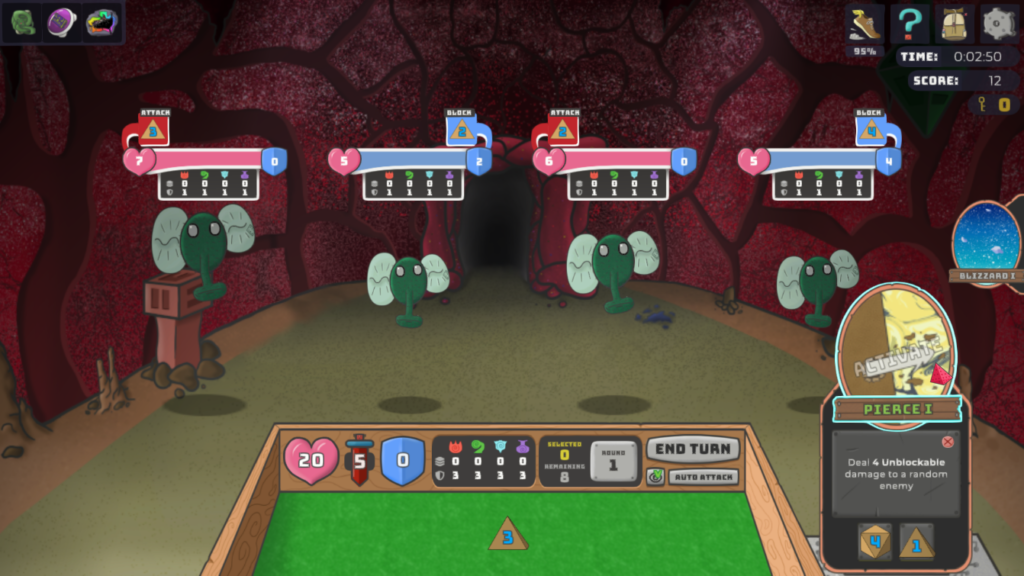
These show up on the right side of the screen, and will glow if you’re able to use them with your current selection of dice. You can only have 3 at a time, so be sure to swap in the ones you need in the inventory screen outside of battles. You won’t be able to swap gambits in and out of your hand in the middle of a fight.
You can hover over the slots of a gambit to see what kind of die it requires, and click its portrait to automatically fill the slots with recommended dice. Once ready, click it again to unleash its effect. Each of your gambits can only be used once per round.
To find out more about gambits, check out the gambits article.
Rooms #
If you need a reminder about room icons, you can check the handy-dandy legend on the right side of the screen when you’re on the map.
Battle #

You’ll spend a majority of your time in the Quantum Realm dealing with enemy encounters, which trigger battles as described above. Your end-goal for each level is to reach its unique boss, who guards the entrance to the next level and will net you powerful upgrades. But it’s not all strife; you’ll find plenty of other rooms that offer helpful services to help you prepare for your adventure.
Forge #
At the forge, you can upgrade your dice’s quality (their maximum roll), or change their element. There’s only one forge per level, and the elements they offer change depending on the level. For the first level, however, you are guaranteed to be offered each element. Be careful though: dicesmithing is a taxing process, and each forge’s anvil can only perform 3 upgrades before breaking.

Shop #
There also shops scattered about the Quantum Realm. These will – naturally – sell you tricks, gambits, and a shiny new die in exchange for your gems. As you invest more and more gems here across your runs, the merchant will upgrade their stall and potentially offer you exclusive discounts.
Treasure #


You’ll also encounter treasure rooms as you explore, and there are always 2 on each level. They contain chests with gems and a guaranteed trick reward. You’ll always start next to one on the first level.
There will also be a locked variant, which requires you to retrieve a key from an elite group of enemies somewhere on the level. These elites will be among the toughest baddies you’ll encounter in the game, so you’d better be geared up before facing them!
Fountain #



Fountains are the only reliable source of healing in the game. Using them will heal you for 25% of your maximum health. Bear in mind: a fountain can only be used once, so make sure you save them for when you really need them. There’s 3 in the first level and 2 on the others, so you’ll have to pace yourself.
Blood fountains are a… ‘unique’ form of hydration. They’ll heal you based on the number of enemies left on the level (more enemies = more healing), but in exchange, all the remaining enemies will become much tougher. The real allure of blood fountain isn’t necessarily the healing, but the increased gem rewards you get from the tougher battles. That said, the healing’s nothing to sniff at, and can help you out even if you don’t fight any of the tougher enemies.
Altar #
Altars can grant you special powers or permanent buffs to your dice. If you’re overwhelmed by the choice at first, we recommend picking the neutral option for a simple but effective buff that’ll help you go far, but when you’re ready, diving into aligned dice can make for extremely powerful builds.

Laboratory #
The laboratory allows you to combine gambits for a fee, which will produce stronger variations or brand new ones that combine their effects. There’s a ton of possibilities here for you to explore, including many that can only be acquired through crafting, so experiment and see what you can come up with!

Bounty #
Finally, you’ll also notice bounty encounters on most levels besides the first and last ones. Defeating these difficult groups of enemies will unlock a new character for you to try out, who’ll be an elemental specialist matching the level you completed the bounty on. You can find out more about each character that’s available in the characters section of this wiki.

Advanced gameplay #
Generally speaking, the procedure of gathering items from battles and rooms and strengthening your character in preparation for the boss is called the primary gameplay loop. There’s 2 other gameplay loops: the secondary (beating an entire run), and tertiary (meta-progression, or permanent unlocks). We’ve designed Diceheart so that you don’t have to worry about understanding every mechanic from the outset. Just play the game and have fun, and you’ll naturally pick up more and more as you keep getting further and further in your runs.
Naturally, there’s a lot more going on past what we’ve described here. If you want to find out about certain systems in more depth, check out their specific articles in the gameplay section, or take a look at the advanced gameplay article for details on some hidden mechanics.
